- Log in to Zoom Admin Portal with an account that has Zoom Phone admin role.
- Go to ADMIN --> Phone System Management --> Phone & Devices
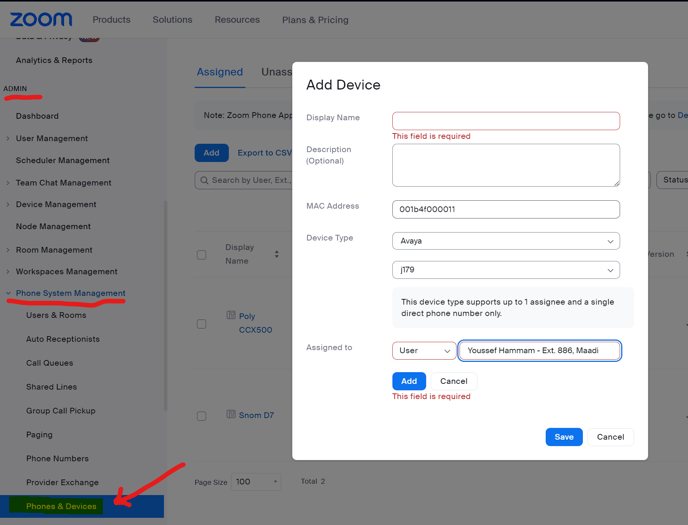
- Click Add
- Enter the following details...
Device Name
Description
MAC Address of the phone you want to provision.
Device Type --> select Avaya
In the drop down below, select J179
- Click Save
- On your DHCP server add an HTTP option with the Provisioning URL or add it to the device manually
Supported models:
https://provavp.zoom.us/api/v2/pbx/provisioning/Avaya/j179
https://provavp.zoom.us/api/v2/pbx/provisioning/Avaya/j159
https://provavp.zoom.us/api/v2/pbx/provisioning/Avaya/j139
Notes:
- Before migrating the Avaya J100 series phone to Zoom, it is essential to ensure that the MAC address of the phone has been released from the previous service provider account. This is necessary to complete the provisioning successfully.
- The assisted provisioning using the Zoom provisioning URL is not available for Avaya J100 series phones. Please ensure that the network connection to the Avaya zero touch provisioning server is allowed in your firewall rules. For more information about zero touch provisioning firewall rules, refer to the Avaya DES support site.
Provisioning using the Enrollment Code:
- Ensure Avaya zero touch provisioning firewall rules are applied.
- Check your network connection by opening a web browser and ensure that you can access https://des.avaya.com
- Factory reset the phone:
- On your phone, select the Admin key if already shown on the display. Otherwise, press the Menu button or More key and select Admin.
- In the Access code field, enter the default admin password 27238 and press Enter
- Scroll down to Reset to defaults and press the Select key.
- Press the Reset key.
- During initial boot-up, the phone prompts users to select if they want to contact the Avaya zero touch provisioning server. Select Yes when the phone displays the Do you want to activate Auto Provisioning now prompt.
- Enter the enrollment code 50033535 when prompted
- Your phone will reboot to complete the provisioning process.
If you want to check whether provisioning is successful, click the "Check" button after rebooting is totally completed.