If you have an existing Polycom RealPresence (either Group Series, Debut, HDX, or Trio) room system in place, you can integrate the system with Zoom. This lets you start a scheduled Zoom meeting directly from your existing hardware. You can also start an instant meeting if the room is configured with a Personal Meeting ID, or use the room to join Zoom meetings that are not on the calendar.
This article covers:
- Associate the Zoom Connector with your network
- Install the Zoom API Connector software
- Prepare the Polycom system for provisioning
- Provision the Polycom system and calendar with Zoom cloud settings
- Manage Polycom room settings
Prerequisites
General requirements
- A Zoom account with a Cloud Room Connector license
- A Polycom system that is powered on and has all components connected, including a cable to your network and a connection to a TV screen. Learn more about supported devices and firmware.
API Connector requirements
- A Windows PC, Server, or Virtual Machine (for installing and running the Zoom API Connector software locally)
- 2 core processor
- 8 GB of Ram
- 20 GB of storage
Note: The above device requirements support up to 200 endpoints.
Associate the Zoom Connector with your network
- Sign in to the Zoom web portal.
- In the navigation panel, click Room Management then Cisco/Polycom Rooms.
Note: If you do not already have a Cloud Room Connector license, this page provides instructions on how to purchase it. - Click the API Connectors tab, then click Add API Connector.
- Enter the network information in the popup dialog.
By default, the range covers all possible networks that your system might be using. You can limit this to the actual network and subnet information used with your Polycom system.
Note: If you need to use multiple connectors, make sure that the network values that you specify for each connector do not overlap. - Click Save.
The new connector, with an automatically generated Connector ID, displays in the list of API Connectors. The Connector ID, which is copied to your clipboard when it is generated, will be used in the procedure to install the Zoom API Connector software.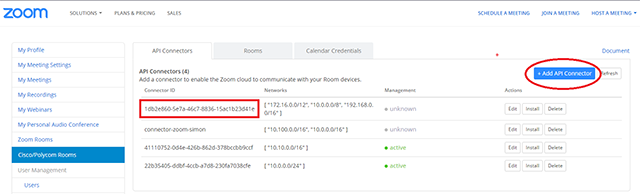
Install the Zoom API Connector software
The Zoom API Connector installer opens a wizard, where you enter the Connector ID (created in the previous procedure) associated with the Zoom cloud.
Note: The API Connector software runs on a Windows Server or Virtual Machine.
- Sign in to the Zoom web portal.
- In the navigation panel, click Room Management then Cisco/Polycom Rooms.
- Click the API Connectors tab, then click the Install action for the connector.
This downloads the installer for the Zoom API Connector ready for installation and copies the Connector ID to the local clipboard for your convenience. - If the ZoomAPIConnector.msi file was downloaded using a different computer than the one your are installing on, move the file to the installation computer.
- Double-click ZoomAPIConnector.msi to open the wizard and begin the installation process.
- Use the wizard pages to accept the license agreement and specify an installation location, then click Next.
- Enter the Connector ID in the Customize this installation page of the wizard.
This is the value that was automatically generated in the procedure to associate the Zoom Connector to the network.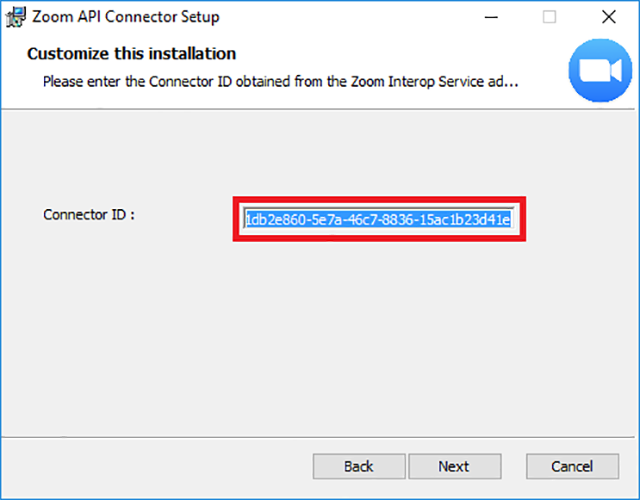
- Click Next, then click Install to install the Zoom API Connector software.
- After the installation is complete, click Finish to exit the wizard.
The Zoom API Connector is now associated with the network that includes the Polycom room system. The Zoom API Connector application only needs to be installed one time, regardless of how many Polycom systems you need to configure. The Zoom API Connector software may be disabled or uninstalled after the systems are configured, however it must be running whenever you change the configuration information.
Note: For testing or short term use, you can install and run the Zoom API Connector software on any Windows computer including a workstation. To gain the maximum benefit and convenience, Zoom recommends that you keep the Zoom API Configuration software running on a Windows Server or a Virtual Machine that is always available.
Prepare the Polycom system for provisioning
For best results, it is recommended to clear any previous configuration prior to enabling on the Zoom platform by performing a factory restore.
Note: If a Polycom system is later removed from the Zoom platform, some settings may remain in place even after the device no longer retrieves its provisioning profile from Zoom. In this case, it is recommended to also perform a factory restore for the Polycom system after removing it from the Zoom platform.
Provision the Polycom system and calendar with Zoom cloud settings
Use the Room Connector API to populate the provisioning settings for the Polycom system and connect it with a calendar that is accessible to the Zoom cloud.
- Sign in to the Zoom web portal.
- In the navigation panel, click Room Management then Cisco/Polycom Rooms.
- Click the Rooms tab, then click Add Room.
The Edit dialog displays. - Click Show advanced options.
- Under the Room Profile section, enter the Room Name that will be displayed on the Rooms tab of the Calendar Integration page. The name of the Edit dialog changes as you type in this field.
Note: If this is for a Polycom HDX room type, the room name can't contain any of the following special characters: !@#$&*;,- - Under the Room Setup section, enter the following information:
- Device Disabled: During configuration, leave this toggle switch in the Off position.
- Type: Choose the type of Polycom system you are configuring.
Note: If you select Polycom HDX, ensure that the Room Name doesn't contain any of the special characters listed in step 5. - Serial Number: Enter the serial number for the Polycom system. Obtain the serial number from either the TV screen, the Polycom box, or your invoice for the Polycom equipment.
- Device Username and Device Password: Enter a username and password that will be used to access the Zoom integration in your Polycom system. The password is typically a short numeric string, since you need to enter it using the Polycom remote control.
Note: The value of "1234" is not accepted here as it is the default value and is not secure. - IP Address: Enter the IP address displayed on the TV screen when the Polycom system is ready for integration with Zoom.
- Time Zone: Choose the time zone in which the room is located.
- Alternative Time Server: Enter the value of a local time server if you need to override the default time server.
- Under the SIP / H323 Integration section, enter the following information:
- Registration Password: The Registration Password authenticates the automatically generated Registration Username. Enter a custom password or leave this field blank to automatically generate a strong password.
- SIP Call Control: The default value is Enabled, not registered.
- H.323 Gatekeeper: Choose Disabled (default) unless the system encounters a problem and must use the H.323 protocol.
- Call Rate: Choose the highest value supported by any bandwidth constraints in your system. The default value is 1920 (HD Dual Stream). Lower values can impact video quality.
- Video-Sharing Mode: Enable to optimize sharing of video clips when joining a meeting.
- Audio Level: Audio volume on the call. The system default is considered the normal audio level.
- Under the Meeting Settings section, enter the following information:
- Calendars: Enter at least one calendar address (either Exchange, Office 365, or Google) of the room where the Polycom system is located.
- Room Meeting ID: If your Polycom system has been registered as a Zoom Room, it has an assigned Personal Meeting ID, which can be used to start instant meetings. Obtain this value on the Edit page for the room. Sign in to the Zoom web portal as an administrator and click Zoom Rooms. Click the name of the room, then click the Edit button.
- Join a Meeting: Click the toggle to enable if you want the Polycom system to have a Speed Dial option for joining meetings that are not on the calendar. To join a meeting, use the remote control or touch panel to enter the Meeting ID.
- Ad-hoc Join/Meet Now location: This option is available only for Group Series. Choose whether to enable the Polycom system to use the Speed Dial mode or the Dynamic Calendar mode by default, or to turn off both of these modes.
- If you choose Speed Dial or Favorites, your speed dial settings are configured so that you can start a meeting (if you entered the Meet Now ID) and join a meeting (if you chose Enable Join a Meeting) from the Speed Dial menu.
- If you choose Dynamic Calendar, you see the ‘Meet Now’ or ‘Join a Meeting’ presented on the calendar view in addition to actual list of events in the room’s calendar. The Speed Dial menu is not displayed. A Call button displays at the meeting start time, enabling you to start the meeting. This is available for Group Series only.
- If you choose Contacts or Local Contacts, then the Join meeting option and Meet now option are available on the Contacts button of your device.
- If you choose Off, ‘Meet Now’ and ‘Join a Meeting’ options are only available from the system directory.
- Under the Advanced section, in the Alternative Room Connector field, change this value if you are using a Virtual Room Connector.
- Click Save.
The values that you entered are used to provision the Polycom system with services and settings, including calendaring, SIP or H.323 service, and other system settings optimized for use with Zoom meetings. - Click the Calendar Credentials tab.
Note: It might take several seconds before the values saved in the Rooms tab populate the Calendar Credentials tab. - Find the entry for each of the calendars that you entered in the Calendars field of the Edit dialog (in step 8), and then do one of the following:
- For a Google calendar:
- Click the Approve action.
- Click Allow in the dialog that shows the actions that Zoom will use for calendar management.
- For an Outlook or Exchange calendar:
- Click the Edit action to open the dialog.
- Choose the Type (either ews for Exchange or o365 for Outlook).
- Enter the Username and Password for the account.
- Click Save.
- For a Google calendar:
After calendar access has been approved, the Polycom system is provisioned for Zoom meetings that are on the associated calendar. Any Zoom meetings that you start or join from your Polycom room system display on the TV screen, using the integrated camera for video and the integrated speakers and microphones for audio during the meeting.
Additional options are available for controlling the information that displays from the calendar. To change or remove information from the screen of your Polycom system:
- Sign in to the Zoom web portal.
- In the navigation panel, click Room Management then Cisco/Polycom Rooms.
- Click the Calendar Credentials tab, then click Edit in the Action column for the calendar.
- Scroll to the bottom of the dialog and change any of the following settings:
- Hide Topic: Toggle this option to Hide if you want to prevent the meeting topic from being displayed on the screen. If you leave this toggled to Default, the meeting topic from the calendar displays, if it is available.
- Hide Agenda: Toggle this option to Hide if you want to prevent the meeting description from being displayed on the screen. If you leave this toggled to Default, the meeting description from the calendar displays, if it is available.
- Default Topic: The topic that displays on your system screen for meetings in the room’s calendar that are not Zoom meetings, if the meeting topic is not available in the calendar. If you do not change this value, the topic that displays is Reserved.
Tip: If you need to include the name, you can use the special token for example 'Reserved for ' - Default Topic (Zoom): The topic that displays on your Cisco screen for a Zoom meeting if the meeting topic is not available in the calendar. If you do not change this value, the topic that displays is Zoom Meeting.
Manage Polycom room settings
Use the actions on the Rooms tab to Edit or Delete configuration settings.
If the Management column shows that the room is active, you can click that entry to display a menu. The menu items provide access to remote diagnostics tools on the Polycom system, if they are available. Note that the items on this menu are provided as a convenience, but are not supported by Zoom or Polycom.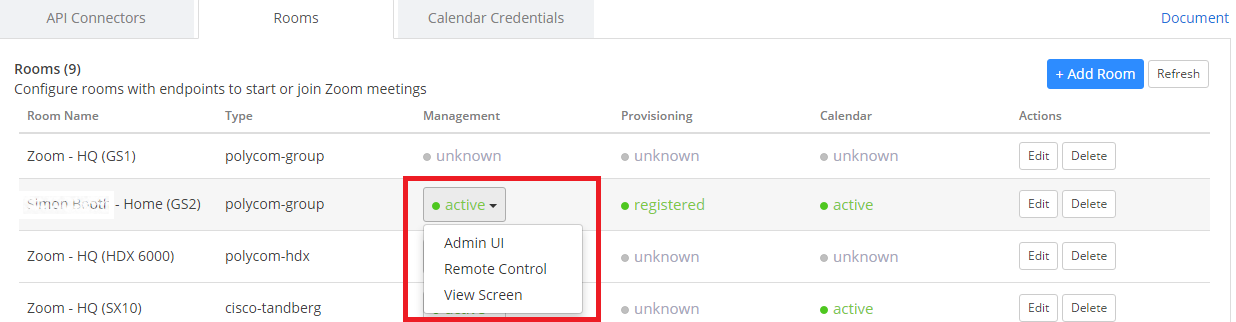
Choose Admin UI to display the administrator console for the room: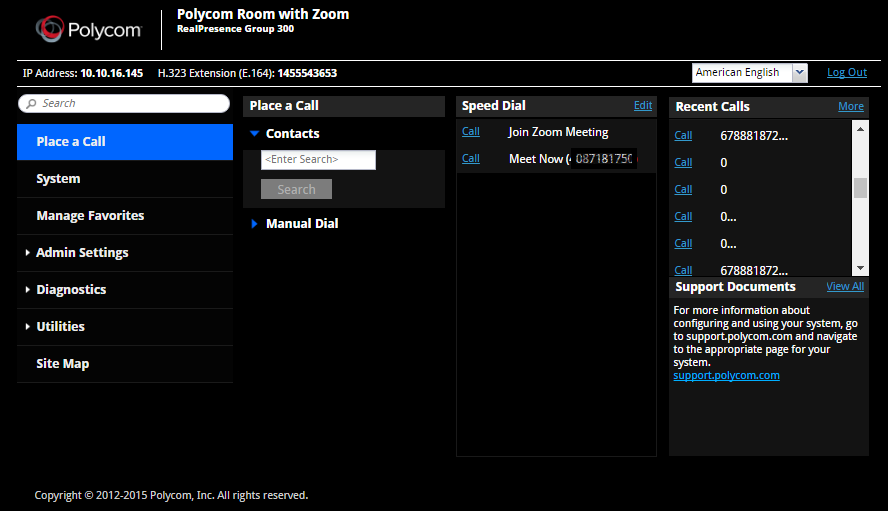
Choose Remote Control to view and interact with the web interface of the room touch control.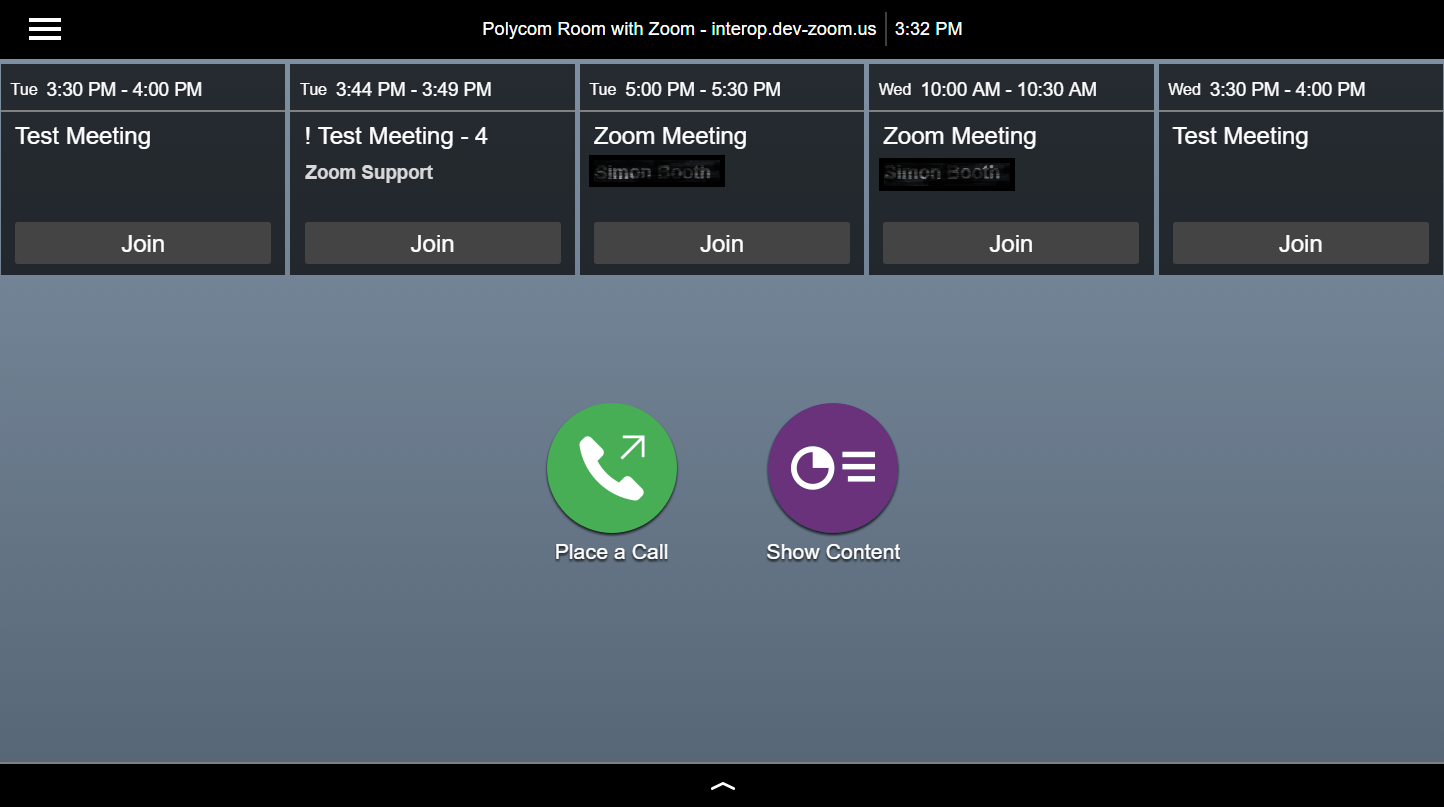
Choose View Screen to view what is current displayed on the room display: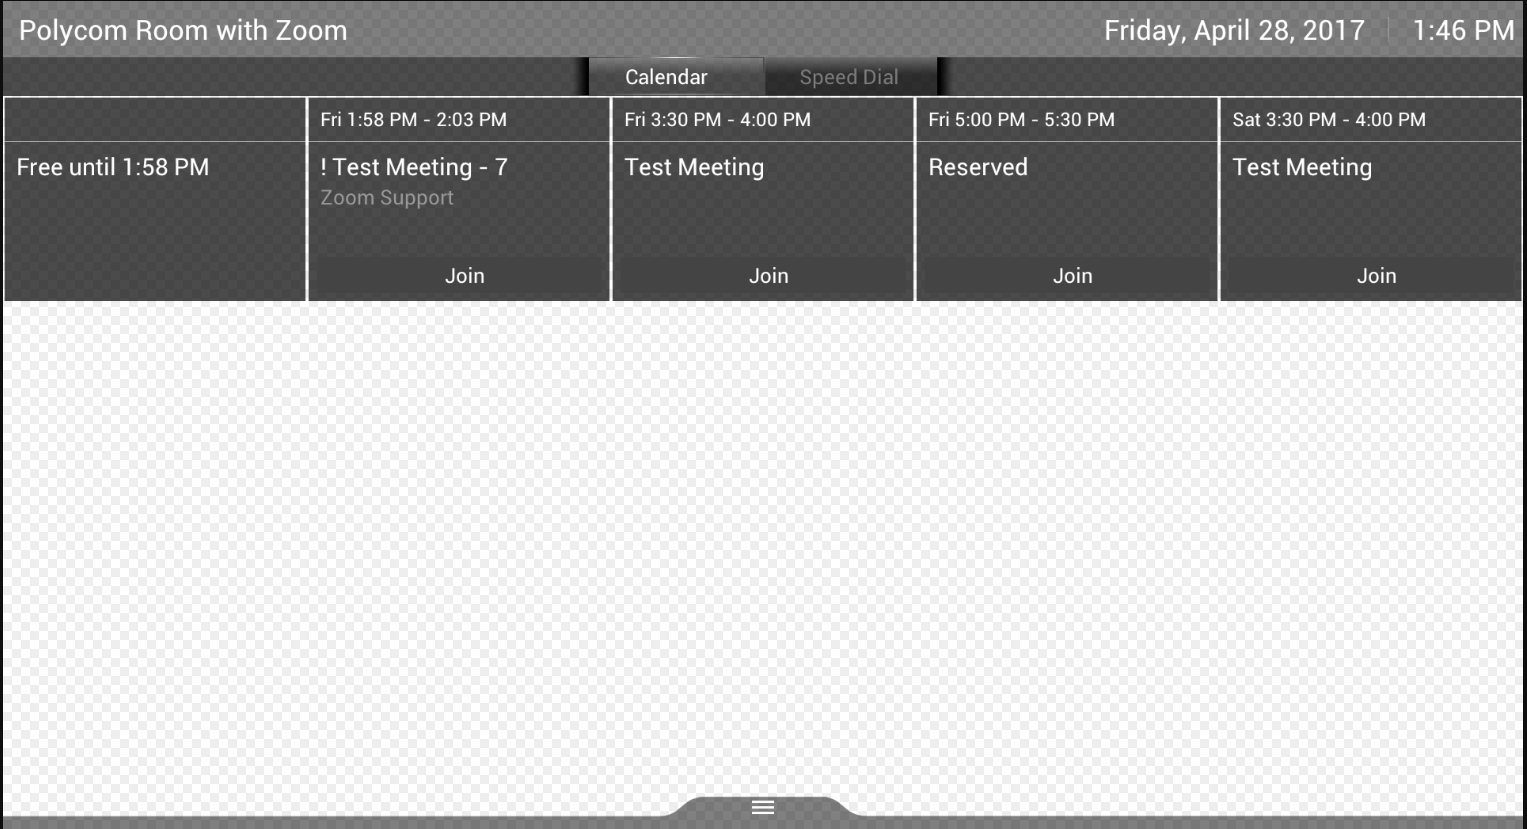
Additional information about the Polycom room systems is available from the Polycom support site: